Difference between revisions of "Free Compiler Setup"
(Added info about new windows sdk) |
(Added category.) |
||
| (15 intermediate revisions by 12 users not shown) | |||
| Line 1: | Line 1: | ||
| − | This page documents the travails and heartache necessary to get the | + | This page documents the travails and heartache necessary to get the Visual Studio to compile Orbiter projects. |
| + | |||
| + | A video tutorial is also available [http://www.youtube.com/watch?v=VBRLkN__YIo HERE]. | ||
== Requirements == | == Requirements == | ||
=== Get the Compiler === | === Get the Compiler === | ||
| − | Go to the [ | + | Go to the [https://visualstudio.microsoft.com/downloads/ Visual Studio download center] and get the compiler. |
| − | |||
| − | |||
| − | |||
Tell the program you are agreeing to its pernicious license agreement, but do it with your fingers crossed. | Tell the program you are agreeing to its pernicious license agreement, but do it with your fingers crossed. | ||
| Line 15: | Line 14: | ||
=== Get Orbiter and the SDK === | === Get Orbiter and the SDK === | ||
| − | Get Orbiter and | + | Get Orbiter from [[Orbithangar]] and unpack it.<ref>[https://www.orbithangar.com/orbiter.php Orbiter Download], Retrieved 2019-04-02</ref> |
| + | |||
| + | For the latest version of Orbiter, 2016, you need the Orbiter Base (160828) | ||
| + | |||
| + | For the older Orbiter 2010 version, you need the Orbiter Base (100830) | ||
| − | For the | + | For the older Orbiter 2006 version, you need the following files: |
#Orbiter Base (060929) | #Orbiter Base (060929) | ||
#Orbiter SDK (060929) | #Orbiter SDK (060929) | ||
| − | |||
| − | |||
| − | |||
| − | |||
| − | |||
| − | |||
| − | |||
| − | |||
| − | |||
| − | |||
| − | |||
| − | |||
Unpack all these files into the same folder, in order. A good choice is <tt>C:\Orbiter</tt>. This document assumes you use this path, from now on. | Unpack all these files into the same folder, in order. A good choice is <tt>C:\Orbiter</tt>. This document assumes you use this path, from now on. | ||
| Line 42: | Line 33: | ||
You need the SDK to get <tt>windows.h</tt> and its associated files. | You need the SDK to get <tt>windows.h</tt> and its associated files. | ||
| − | The latest version of the SDK (Microsoft | + | The latest version of the SDK (Microsoft Windows SDK for Windows 7 and .NET Framework 4) is available as [https://www.microsoft.com/en-us/download/details.aspx?id=8279 Web Installer]. |
| − | |||
| − | |||
| − | |||
| − | |||
Run the installer and uncheck everything but what is shown below. | Run the installer and uncheck everything but what is shown below. | ||
| Line 54: | Line 41: | ||
== Setting up a project == | == Setting up a project == | ||
| − | VC++ 2003 files are not perfectly compatible with VC++ 2005, and the non-free version is not perfectly compatible with the free version. You can either use [[Vessel template wizard]] or manually change existing project to make it to get to compile. Fortunately, those changes are small, and the same for all projects. | + | VC++ 2003 files are not perfectly compatible with VC++ 2005, and the non-free version is not perfectly compatible with the free version. You can either use [[Vessel template wizard]], [[MFD Wizard]] or manually change existing project to make it to get to compile. Fortunately, those changes are small, and the same for all projects. |
We will modify the ShuttlePB project to work with the VC++2005. Start VC++, and open the project file <tt>OrbiterSDK\samples\ShuttlePB\ShuttlePB.dsw</tt>. | We will modify the ShuttlePB project to work with the VC++2005. Start VC++, and open the project file <tt>OrbiterSDK\samples\ShuttlePB\ShuttlePB.dsw</tt>. | ||
| Line 76: | Line 63: | ||
[[Image:SDKInstall5.png]] | [[Image:SDKInstall5.png]] | ||
| − | === C++ language change === | + | <!-- === C++ language change === |
There are a few important changes between code for Visual C++ 2005 and earlier versions. Fortunately, only small modifications to the code are required to compensate for them. | There are a few important changes between code for Visual C++ 2005 and earlier versions. Fortunately, only small modifications to the code are required to compensate for them. | ||
| Line 107: | Line 94: | ||
Note that to allow backwards compatibility it's best to always define a for() loop variable outside the loop in this manner, even when no code tries to access the variable outside the loop. Otherwise, if, for example, you include two for() loops in the same function which both define <tt>int i</tt> as their loop variable, it will compile in VC++2005 but fail to compile in older versions. | Note that to allow backwards compatibility it's best to always define a for() loop variable outside the loop in this manner, even when no code tries to access the variable outside the loop. Otherwise, if, for example, you include two for() loops in the same function which both define <tt>int i</tt> as their loop variable, it will compile in VC++2005 but fail to compile in older versions. | ||
| − | There is an option in the project compiler settings window which changes this particular standard, but the code change makes the code clearer and more readable, and, more importantly, it's now correct C++ code according to the C++ standard. | + | There is an option in the project compiler settings window which changes this particular standard, but the code change makes the code clearer and more readable, and, more importantly, it's now correct C++ code according to the C++ standard. --> |
=== Adding and Removing libraries === | === Adding and Removing libraries === | ||
| Line 121: | Line 108: | ||
== Compiling and adding resource files == | == Compiling and adding resource files == | ||
| − | + | '''Not required for the ShuttlePB example, ONLY REQUIRED FOR VC++ 2003 toolkit and earlier. VC++ 2005 and VC++ 2008 express edition compilers can compile resources without problems''' | |
VC++ 2003 toolkit doesn't support the compilation of resource files (.res) from source files (such as bitmaps .bmp). However, there is a command line resource compiler (rc.exe) which is installed when you install VC++ Express. The default location for this program is C:\Program Files\Microsoft Visual Studio 8\VC\Bin\rc.exe. | VC++ 2003 toolkit doesn't support the compilation of resource files (.res) from source files (such as bitmaps .bmp). However, there is a command line resource compiler (rc.exe) which is installed when you install VC++ Express. The default location for this program is C:\Program Files\Microsoft Visual Studio 8\VC\Bin\rc.exe. | ||
| Line 169: | Line 156: | ||
== Reloading the project == | == Reloading the project == | ||
Once the project has been saved VC++2005 will have created a number of new files in the original directory. To reopen the project at a later date you should open the .sln file, as opposed to the original .dsw file. If you open the project from the .sln file all of the changes you made in the previous section will be intact as opposed to going through the process of conversion again. | Once the project has been saved VC++2005 will have created a number of new files in the original directory. To reopen the project at a later date you should open the .sln file, as opposed to the original .dsw file. If you open the project from the .sln file all of the changes you made in the previous section will be intact as opposed to going through the process of conversion again. | ||
| + | |||
| + | <!-- == Visual C++ 2010 Express == | ||
| + | |||
| + | The instructions in this [http://www.youtube.com/watch?v=VBRLkN__YIo video], mentioned above, were tested and verified also with Visual C++ Express 2010, and everything works fine. One note, VC++2010 hides the build button per default, so one needs to activate expert mode (read [http://www.daniweb.com/software-development/cpp/threads/290416/1249773#post1249773 here]). --> | ||
== Errors and solutions == | == Errors and solutions == | ||
| Line 175: | Line 166: | ||
'''Error:''' fatal error RC1015: cannot open include file 'afxres.h'. | '''Error:''' fatal error RC1015: cannot open include file 'afxres.h'. | ||
| − | '''Solution:''' add the 'include\mfc\' folder of the Platform SDK (default <tt>C:\Program Files\Microsoft Platform SDK\include\mfc</tt>) to "Configuration Properties/Resources/Additional Include Directories" | + | '''Cause:''' The Platform SDK is not installed (see 'Get the Windows SDK' section) or the Visual Studio default paths have not been configured to include the Platform SDK directories. |
| + | |||
| + | '''Solution:''' Add the Platform SDK '\include\mfc\' folder (default <tt>C:\Program Files\Microsoft Platform SDK\include\mfc</tt>) to the Visual Studio default paths. For Visual Studio 2010, open the Property Pages dialog and go to Configuration Properties->VC++ Directories->Include Directories. For older versions of Visual Studio, open the Options dialog and edit Projects and Solutions->VC++ Directories->Include files. | ||
| + | |||
| + | '''Alternate Solution:''' add the 'include\mfc\' folder of the Platform SDK (default <tt>C:\Program Files\Microsoft Platform SDK\include\mfc</tt>) to "Configuration Properties/Resources/Additional Include Directories". This solution will not work for other users who have installed the Platform SDK in a different location. | ||
=== error LNK2019: unresolved external symbol ... === | === error LNK2019: unresolved external symbol ... === | ||
| Line 207: | Line 202: | ||
{{HasPrecis}} | {{HasPrecis}} | ||
| − | [[Category:Tutorials]][[Category: | + | == References == |
| + | <references/> | ||
| + | |||
| + | == External Links == | ||
| + | *[http://www.youtube.com/watch?v=VBRLkN__YIo Comprehensive video tutorial on setting up a development environment] | ||
| + | |||
| + | [[Category: Articles]] | ||
| + | [[Category:Tutorials]][[Category:Add-on tutorials]] | ||
Latest revision as of 10:38, 14 October 2022
This page documents the travails and heartache necessary to get the Visual Studio to compile Orbiter projects.
A video tutorial is also available HERE.
Requirements[edit]
Get the Compiler[edit]
Go to the Visual Studio download center and get the compiler.
Tell the program you are agreeing to its pernicious license agreement, but do it with your fingers crossed.
Install the Graphical IDE, but not MSDN or SQL stuff.
Get Orbiter and the SDK[edit]
Get Orbiter from Orbithangar and unpack it.[1]
For the latest version of Orbiter, 2016, you need the Orbiter Base (160828)
For the older Orbiter 2010 version, you need the Orbiter Base (100830)
For the older Orbiter 2006 version, you need the following files:
- Orbiter Base (060929)
- Orbiter SDK (060929)
Unpack all these files into the same folder, in order. A good choice is C:\Orbiter. This document assumes you use this path, from now on.
When installing the patches, it will ask if it is ok to replace a file. Say yes to all.
Get the Windows SDK[edit]
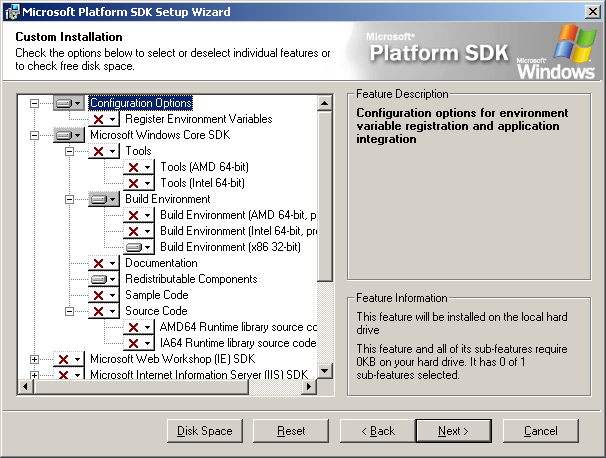
You need the SDK to get windows.h and its associated files.
The latest version of the SDK (Microsoft Windows SDK for Windows 7 and .NET Framework 4) is available as Web Installer.
Run the installer and uncheck everything but what is shown below.
Setting up a project[edit]
VC++ 2003 files are not perfectly compatible with VC++ 2005, and the non-free version is not perfectly compatible with the free version. You can either use Vessel template wizard, MFD Wizard or manually change existing project to make it to get to compile. Fortunately, those changes are small, and the same for all projects.
We will modify the ShuttlePB project to work with the VC++2005. Start VC++, and open the project file OrbiterSDK\samples\ShuttlePB\ShuttlePB.dsw.
Configuration[edit]
At the top, immediately under the menu bar, change the Configuration to Release.
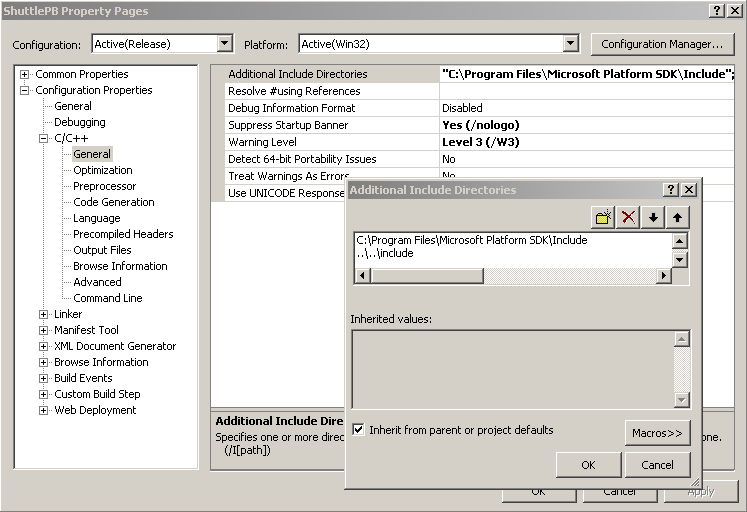
Include path[edit]
Right click on the bold ShuttlePB in the left-hand tree. Select "Properties". Add the SDK include path for both the Platform SDK and the Orbiter SDK to the project include path. The Platform SDK installs itself by default to C:\Program Files\Microsoft Platform SDK so add the path C:\Program Files\Microsoft Platform SDK\Include. Orbiter can be installed anywhere, but if you unpacked it to C:\Orbiter, the correct path is C:\Orbiter\Orbitersdk\include. Or, you can have it be a relative path, like ..\..\include (This number of ..\ is correct for ShuttlePB, check for the right number for anyplace else)
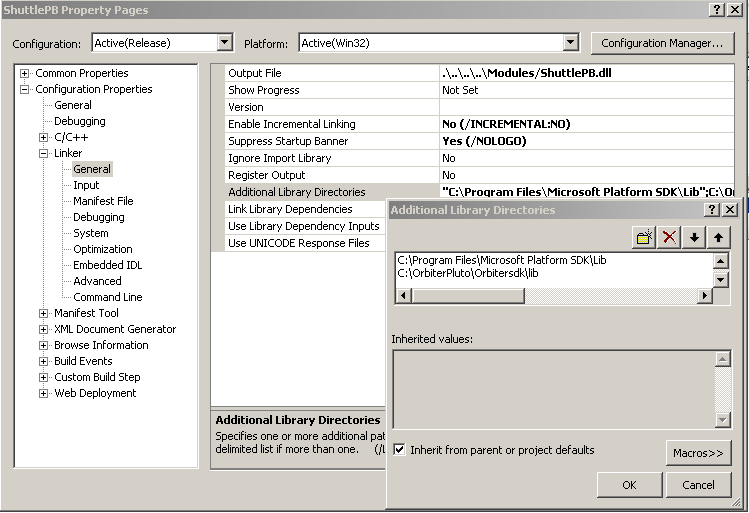
Library path[edit]
Add the SDK library path for both the Platform SDK and the Orbiter SDK to the linker library path. The Platform SDK path default is C:\Program Files\Microsoft Platform SDK\lib. The Orbiter SDK default is C:\Orbiter\Orbitersdk\lib
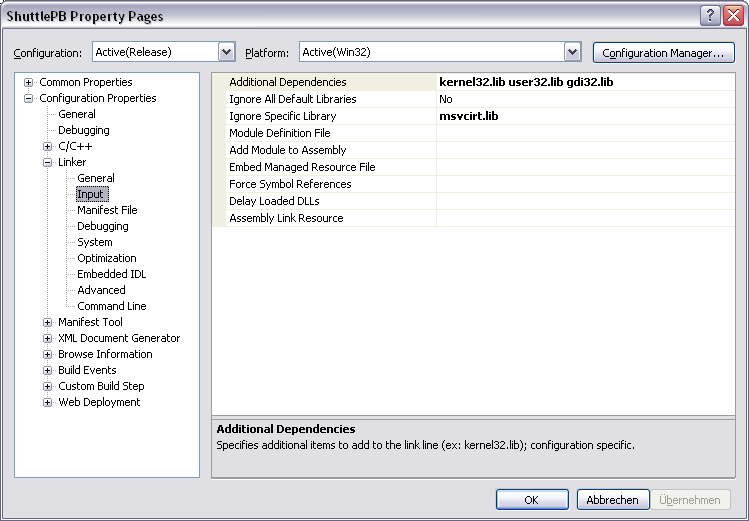
Adding and Removing libraries[edit]
Compiling a vessel requires the Windows SDK library's kernel32.lib,user32.lib and gdi32.lib. These are not linked by default, so you have to add them to the "Additional Dependencies" line.
If ODBC library is specified you may safely remove it from the link options on the "Additional Dependencies" line. Also, by default, the project tries to link against the library msvcirt.lib which is not included in the free VC++2005 download, or the SDK download. We can easily get rid of this also. Add this library to the "Ignore specific library" line.
Edit the project properties, and make the changes as shown below:
Compiling and adding resource files[edit]
Not required for the ShuttlePB example, ONLY REQUIRED FOR VC++ 2003 toolkit and earlier. VC++ 2005 and VC++ 2008 express edition compilers can compile resources without problems
VC++ 2003 toolkit doesn't support the compilation of resource files (.res) from source files (such as bitmaps .bmp). However, there is a command line resource compiler (rc.exe) which is installed when you install VC++ Express. The default location for this program is C:\Program Files\Microsoft Visual Studio 8\VC\Bin\rc.exe.
rc.exe takes as its input a resource description file (.rc) and emits a resource file (.res). Take the example of two bitmaps called panel.bmp and panelLight.bmp. In order to compile these resources create a .rc file which is effectively a text file describing the resources to compile. To compile the above example you would a text file with the following text and save it as a .rc file (in our case panels.rc).
1 BITMAP panel.bmp
2 BITMAP panelLight.bmp
then execute the following command:
rc /r panels.rc
The result is a new file (panels.res). In VC++ you can select to add an existing item and add the .res file to the solution. On next compilation the resource will be embedded in the resulting dll.
Note: In order to call rc from the directory where your files are you will need to add the location of rc to your path.
Compiling the addon[edit]
Use the menu option Build/Build ShuttlePB to compile. It should now compile cleanly, no errors or warnings. The DLL will be in C:\Orbiter\Modules\ShuttlePB.dll. If you are making an MFD or plugin, you will want those to compile into the C:\Orbiter\Modules\Plugin folder. If you go look up this module, it should have the current time, and be accompanied by a .exp and a .lib file, both of which have the current date on them. Load any scenario which uses ShuttlePB and fly it normally.
Debugging the addon[edit]
Microsoft Visual Studio includes a debugger that will enable you to debug your addon quickly and easily without resorting to oapiDebugString all the time.
- Set your active configuration to "Debug" in the Standard Toolbar or Build --> Configuration Manager.

- In your project Properties, set the following options:
- Configuration Properties --> Linker --> General --> Output File - this should be set to your DLL name and put in your orbiter path where orbtier will load it from. Eg, C:\orbiter\modules\plugin\addon.dll
- Debugging --> Command - this should be set to your orbiter.exe. Eg, C:\orbiter\orbiter.exe
- Debugging --> Working Directory - this should be set to the directory that orbiter is in. Eg, C:\orbiter
- C/C++ --> General --> Debug Information Format - set to anything except "Disabled"
Make sure when debugging that you have orbiter running windowed or on another screen to Visual Studio, otherwise you won't be able to see the debugger.
Press F5 to start the program and begin debugging.
Note: When running orbiter, if you exit back to the launchpad, then your module may become detached from Visual studio and not debug. You will either have to quit out of the launchpad entirely, or manually attach it to the orbiter process (Debug --> Attach to process...)
Sharing the addon[edit]
When addons are compiled under VC++ 2005 (VC 8.0) the resulting DLL implements a new component dependency model not present in any previous version of VC++. This model uses an embedded XML file to declare it's dependency to which VC library it uses. For DLL's compiled in VC++ 2005, this means the embedded XML points to MSVCR80.DLL and MSVCP80D.DLL. These two files are not included with "off-the-shelf" copies of Windows. Users of your addon must either have installed the Microsoft .NET 2.0 Framework or the Microsoft Visual C++ 2005 Redistributable Package.
The .NET 2.0 Framework Redistributable can be downloaded here for x86 (32-bit) and here for x64 (64-bit).
If the user does not wish to install the full .NET 2.0 Framework, they can still use your addon by installing the Microsoft Visual C++ 2005 Redistributable Package which can be downloaded here for x86 (32-bit) and here for x64 (64-bit).
Reloading the project[edit]
Once the project has been saved VC++2005 will have created a number of new files in the original directory. To reopen the project at a later date you should open the .sln file, as opposed to the original .dsw file. If you open the project from the .sln file all of the changes you made in the previous section will be intact as opposed to going through the process of conversion again.
Errors and solutions[edit]
cannot open include file 'afxres.h'[edit]
Error: fatal error RC1015: cannot open include file 'afxres.h'.
Cause: The Platform SDK is not installed (see 'Get the Windows SDK' section) or the Visual Studio default paths have not been configured to include the Platform SDK directories.
Solution: Add the Platform SDK '\include\mfc\' folder (default C:\Program Files\Microsoft Platform SDK\include\mfc) to the Visual Studio default paths. For Visual Studio 2010, open the Property Pages dialog and go to Configuration Properties->VC++ Directories->Include Directories. For older versions of Visual Studio, open the Options dialog and edit Projects and Solutions->VC++ Directories->Include files.
Alternate Solution: add the 'include\mfc\' folder of the Platform SDK (default C:\Program Files\Microsoft Platform SDK\include\mfc) to "Configuration Properties/Resources/Additional Include Directories". This solution will not work for other users who have installed the Platform SDK in a different location.
error LNK2019: unresolved external symbol ...[edit]
Error: error LNK2019: unresolved external symbol ...
Solution: add the library containing the required symbol to "Configuration Properties/Linker/Input/Additional Dependencies".
| Symbol | Library |
|---|---|
| __imp__SetWindowTextA@8 | user32.lib |
| __imp__EndDialog@8 | user32.lib |
| __imp__GetWindowTextA@12 | user32.lib |
| __imp__GetDlgItem@8 | user32.lib |
| __imp__DialogBoxParamA@20 | user32.lib |
To Do[edit]
- Check if this compiles vessels with panels.
Precis[edit]
This article has a precis and appears in the Random addon or Random article section on the Main Page. The precis can be found at Free Compiler Setup/precis and is displayed below.
|
Free Compiler Setup. Many Orbiter add-ons come with source code which can be compiled using the free Visual Studio. However, there are a few things that need to be done to make Orbiter projects compile in it. This tutorial goes through the steps necessary to configure Visual Studio for use with Orbiter. (More...)
|
References[edit]
- ↑ Orbiter Download, Retrieved 2019-04-02


